Development guide
Creating a custom module for PrestaShop allows you to extend the functionality of your store and tailor it to meet specific business needs. Custom modules provide a way to integrate new features, enhance existing ones, or adjust the store's behavior to better serve your requirements. In this section, we will guide you through the process of developing a custom module based on the Custom Field Groups module. This approach leverages pre-defined field groups for seamless configuration, minimizing the need for extensive backend development.
You will learn how to set up your module, utilize field groups for configuration, and integrate it into the PrestaShop ecosystem. This guide will cover the essential steps and best practices for building and deploying a custom module, ensuring that it integrates smoothly with PrestaShop and meets your specific needs.
Setting up your module
Setting up a custom module in PrestaShop involves creating a structured module folder, defining essential properties, and extending the CustomFieldGroupsModule class. Follow these steps to get started:
Module structure and requirements
- Create module directory:
Start by creating a new folder for your module in the /modules/ directory of your PrestaShop installation. Name this folder according to your module's name, for example, mymodule.
- Essential files:
Inside your module folder, create the following essential files:
/modules/mymodule/
├── mymodule.php        // Main file of your module
└── install/            // This folder is used to store module field groups
Define module properties
Extend the CustomFieldGroupsModule class to utilize the field group functionality. Ensure that the CustomFieldGroups module is installed and active. If the module is not active, prevent the installation of your module.
<?php

if (!defined('_PS_VERSION_')) {
    exit;
}

if(!Module::isEnabled('customfieldgroups') || !class_exists('CustomFieldGroups\Model\CustomFieldGroupsModule')) {

    /**
     * WARNING: Do not edit this class.
     * Prevents installation if the CustomFieldGroups module is not active.
     *
     * Edit only the subclass present below in this file.
     */

    class MyModule extends Module
    {
        public function __construct()
        {
            $this->name = 'mymodule';
            $this->tab = 'front_office_features';
            $this->version = '1.0.0';
            $this->author = 'John Doe';
            $this->need_instance = 0;

            parent::__construct();

            $this->displayName = $this->trans('CFG - Module Sample', [], 'Modules.MyModule.Admin');
            $this->description = $this->trans('Module sample for CustomFieldGroups.', [], 'Modules.MyModule.Admin');

            $this->ps_versions_compliancy = [
                'min' => '8.0.0.0',
                'max' => _PS_VERSION_,
            ];
        }

        public function install()
        {
            $this->_errors[] = $this->trans('The "Custom Field Groups" module must be enabled to use this module.', [], 'Modules.MyModule.Admin');
            return false;
        }
    }

} else {

    /**
     * Subclass for extending the functionality.
     * NOTE: Make changes only in this subclass.
     * WARNING: The method getContent() is used by CustomFieldGroupsModule to provide the form, do not use it
     */

    class MyModule extends CustomFieldGroups\Model\CustomFieldGroupsModule
    {
        public function __construct()
        {
            $this->name = 'mymodule';
            $this->tab = 'front_office_features';
            $this->version = '1.0.0';
            $this->author = 'John Doe';
            $this->need_instance = 0;

            parent::__construct();

            $this->displayName = $this->trans('CFG - Module Sample', [], 'Modules.MyModule.Admin');
            $this->description = $this->trans('Module sample for CustomFieldGroups.', [], 'Modules.MyModule.Admin');

            $this->ps_versions_compliancy = [
                'min' => '8.0.0.0',
                'max' => _PS_VERSION_,
            ];
        }

        public function install()
        {
            return parent::install() && $this->registerHook('displayReassurance');
        }

        public function hookDisplayReassurance(array $params)
        {
            return '..';
        }
    }

}
Installation and configuration of the module
Once your module is set up and configured, you need to install it and create the necessary field groups through the main module's interface. This section covers these steps:
-
Install the module:
- Go to the PrestaShop back office.
- Navigate to Modules > Module Manager.
- Search for your module and install it.
-
Creating field groups:
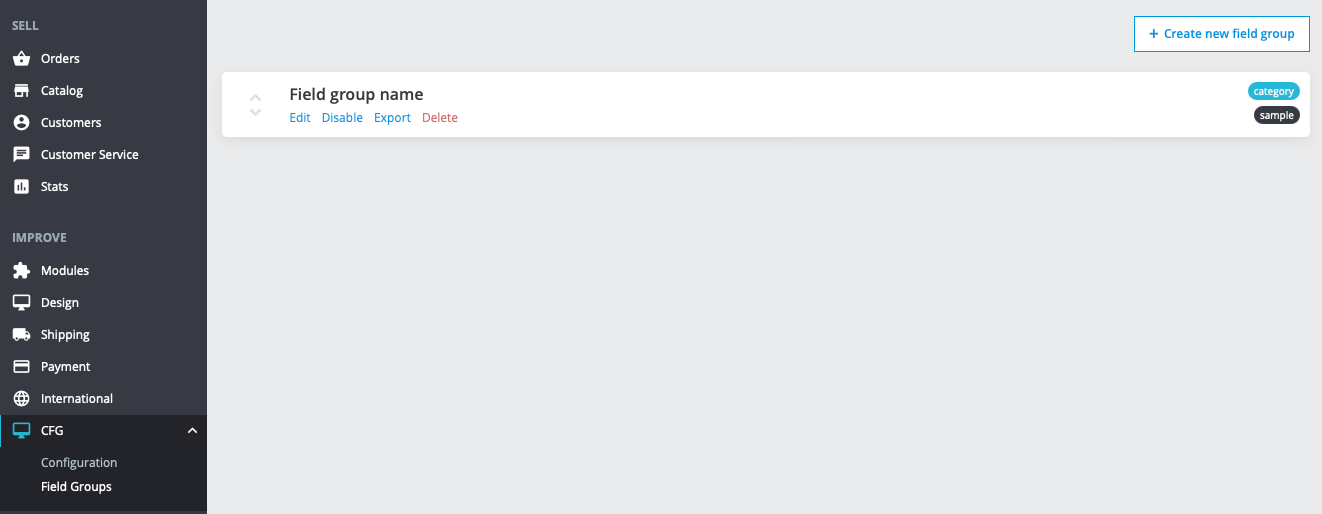
- Access the Field Groups interface:
- Navigate to the CFG > Field Groups tab on your back office.
- Click on the "Create new field group" button.
- Access the Field Groups interface:
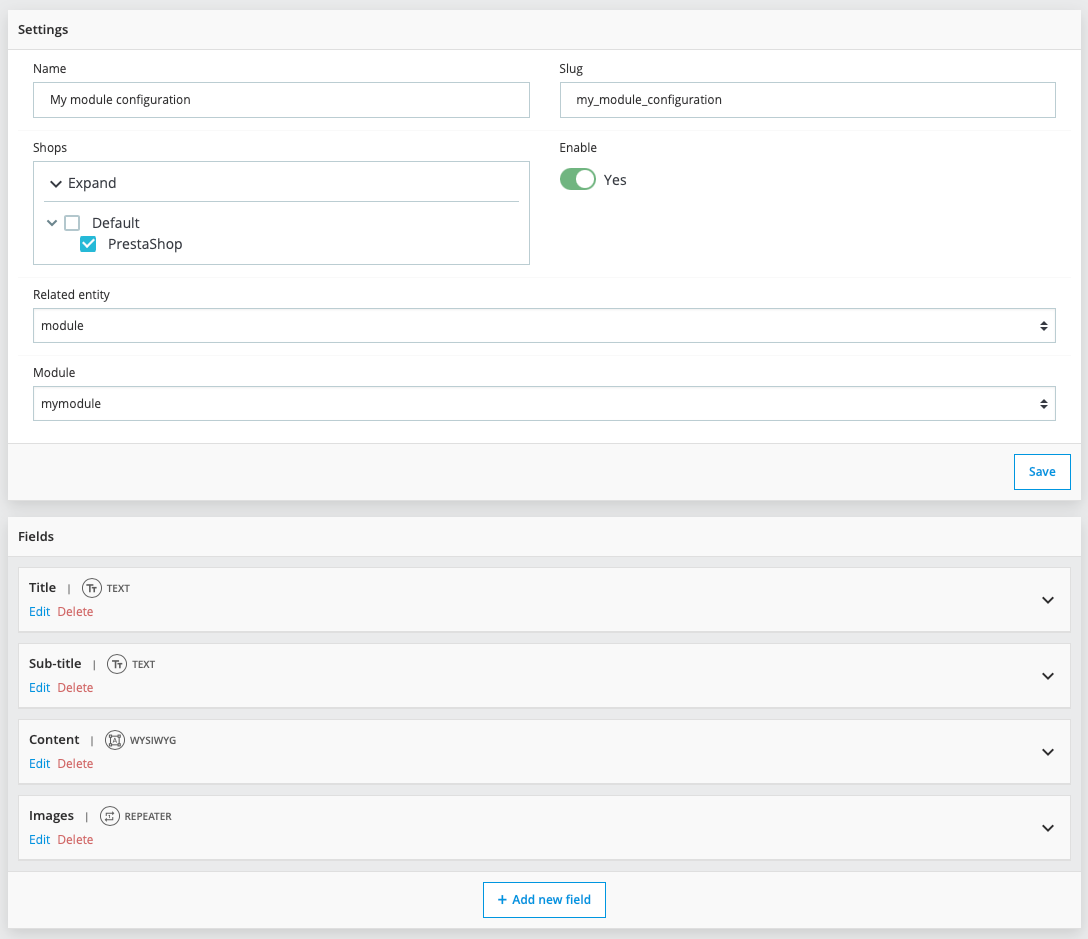
- Configure your new field group:
- Fill in the required details (Name, Slug, etc.) and configure the field group settings as needed.
- Define field group entity as "module" and the module as yours.
- Add fields as many as you need in your field group.
- Save the field group configuration.
Any changes made to the field groups will be reflected automatically in the module’s forms. No additional configuration is required.
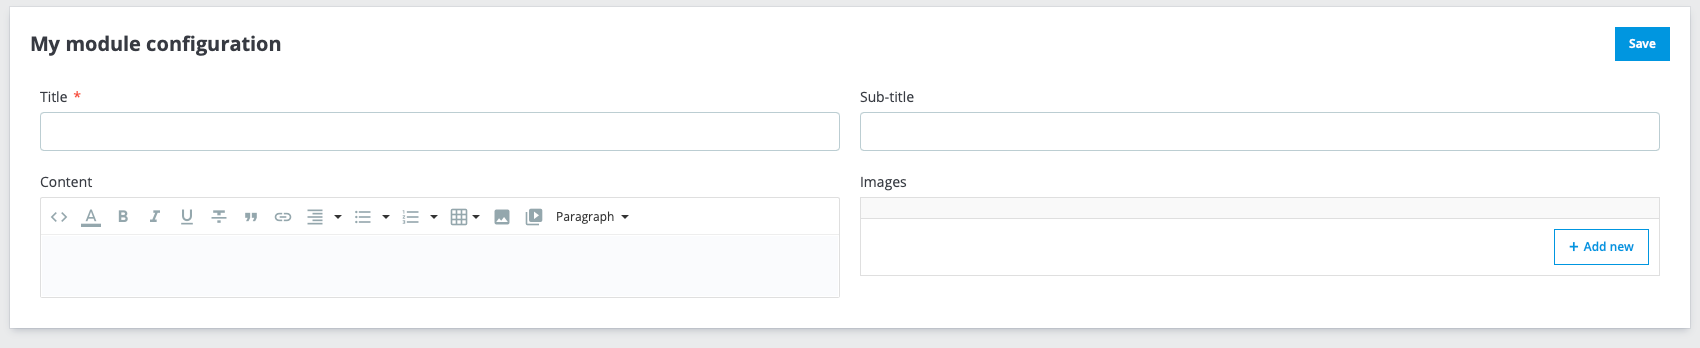
Using the form
Once the module and field groups are set up, you can utilize the forms created with these field groups and retrieve the data as needed.
- Access the form:
- Go to your module's configuration page (as with other modules, found under Modules > Module Manager).
- The configuration page is updated with your field group data.
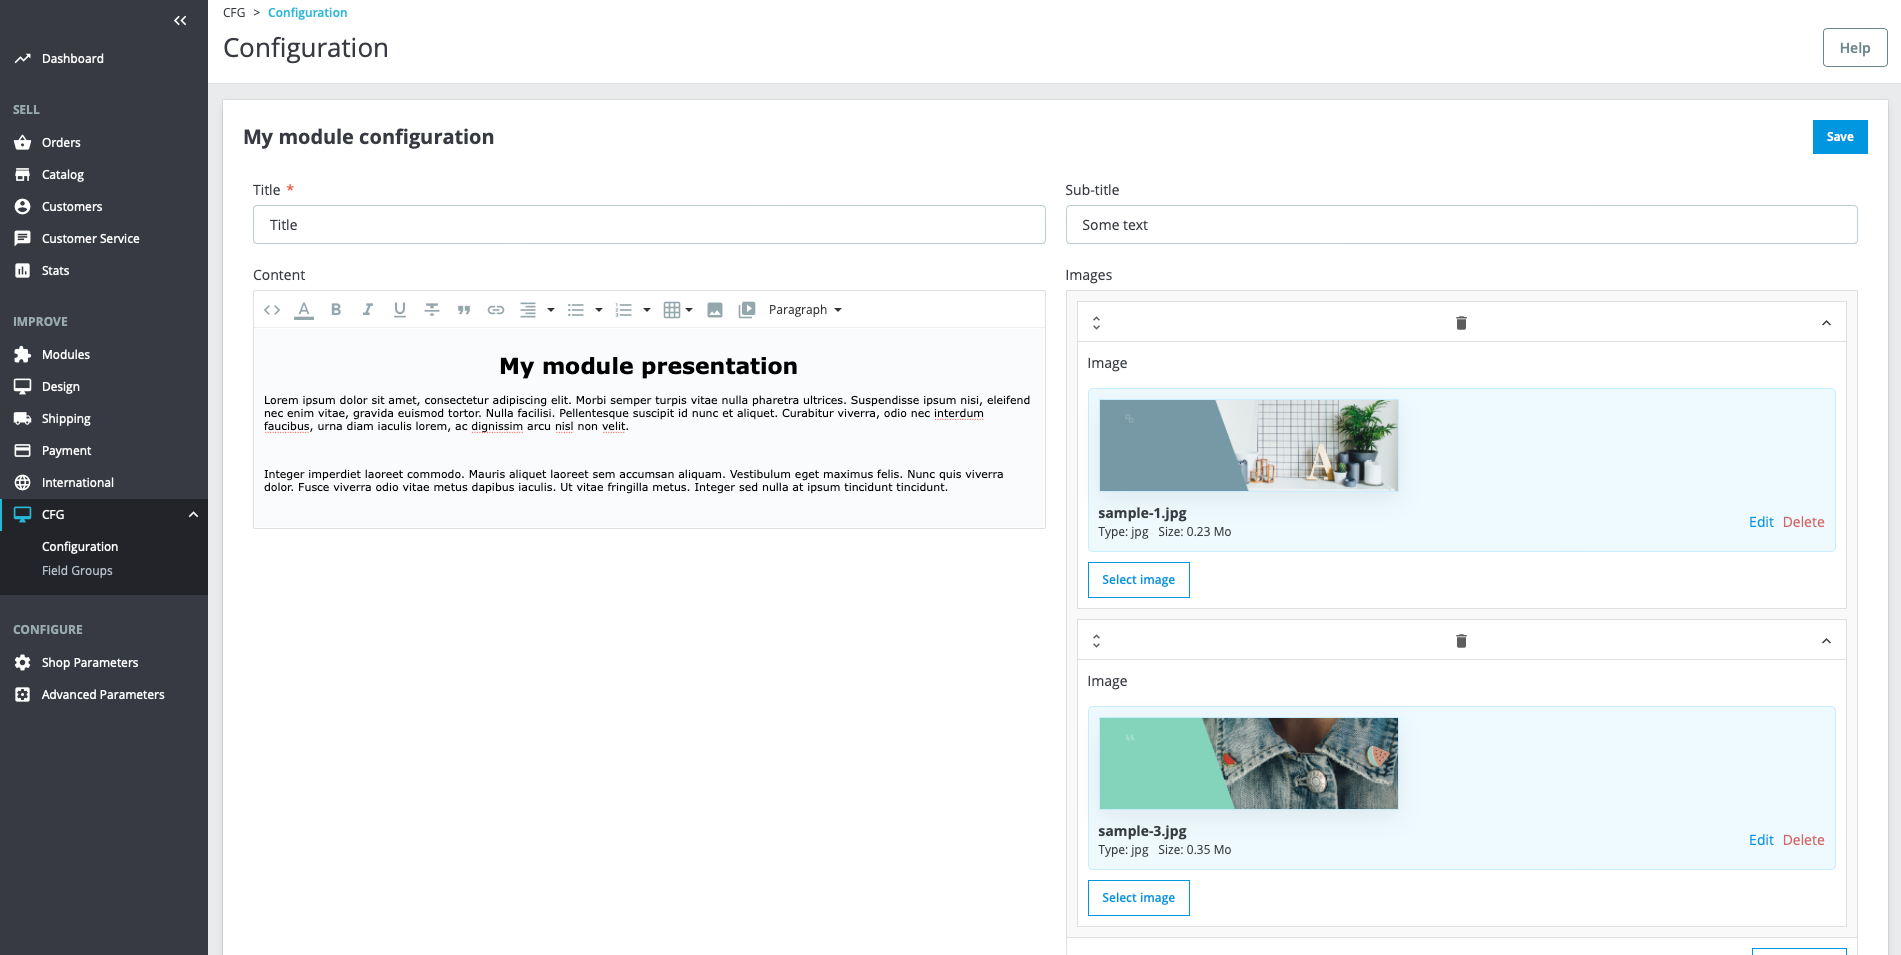
If the form does not appear, check if your field group is enabled, associated with your module, and linked to your current shop.
Multiple field groups and menu
When creating a custom module with the CustomFieldGroups module, you might want to add a menu to the module’s configuration page. This can be useful if you have multiple field groups associated with your module or if you want to add external links for better navigation.
To add a menu to your custom module, you need to implement the getMenu(): array function in your module’s main file. This function returns an array of menu items that will be displayed on the configuration page.
/**
* Define the menu items for the module configuration page.
*
* @return array
*/
public function getMenu(): array
{
    return [
        [
            'type' => 'field_group',
            'value' => 'my_module_field_group_slug', // Field group slug
            'label' => $this->trans('Field group related', [], 'Modules.Mymodule.Admin'),
        ],
        [
            'type' => 'field_group',
            'value' => 'my_second_module_field_group_slug',  // Field group slug
            'label' => $this->trans('Second field group related', [], 'Modules.Mymodule.Admin'),
        ],
        [
            'type' => 'route',
            'value' => 'symfony_route_to_redirect', // Symfony route name
            'label' => $this->trans('Symfony route', [], 'Modules.Mymodule.Admin'),
        ],
        [
            'type' => 'link',
            'value' => 'https://google.com', // Url
            'label' => $this->trans('External link', [], 'Modules.Mymodule.Admin'),
            'new_window' => true, // Target _blank
        ],
    ];
}
Retrieving form data
- In your module main file with the getConfiguration() method.
class MyModule extends CustomFieldGroups\Model\CustomFieldGroupsModule
{

    ...

    public function hookDisplayReassurance(array $params)
    {
        $configuration = $this->getConfiguration();
        ...
    }

    ...

}
- Anywhere on your PHP code with the DataRetrieverFacade class.
use CustomFieldGroups\Facade\DataRetrieverFacade;

public function someMethod()
{
    $dataRetriever = DataRetrieverFacade::getInstance();

    $myModule = \Module::getInstanceByName('mymodule');

    // With entity and module name
    $configuration = $dataRetriever->get('module', 'mymodule');

    // With object
    $configuration = $dataRetriever->get($myModule);

    // With entity and ID
    $configuration = $dataRetriever->get('module', $myModule->id);
}
Saving Field Groups for the module
To ensure your module functions correctly from the moment it is installed, export the
field groups from the "Field Groups" page and place them in the /install/ directory of your module.
This setup guarantees that the field groups are automatically created during installation.

Additionally, the field groups are versioned as files, which supports synchronization between different environments. For detailed instructions on versioning and synchronization, refer to the section versioning of the documentation.